Comment on page
Get started - Cover CLI
Get started with Diffblue Cover CLI - in short, install the CLI tool, apply your license, and you're ready to go. This topic also provides an example and some next steps.
If you've already done this as part of your free trial, you may want to skip this and jump straight to the Cover CLI details, or perhaps you want to update to the latest version - see Update Cover.
Short on time? If you'd like a fast-track experience check out our getting started video. [6 min]
Windows
Linux/macOS
- 1.Download the Diffblue Cover CLI
.exeinstaller or.zipfile from: - The Diffblue website - Free Trial version. - The link sent to you via your Diffblue Cover welcome email. - Your organization's internal file/app store.\ - 2.If you use the installer, run the
.exeinstaller and follow the on-screen prompts - during installation you can select where to install Diffblue Cover. - 3.If you use the archive file, extract the
.zipfile to an appropriate installation folder. Add the install folder path to yourPATHenvironment variable or create a new%DCOVER%environment variable and add that toPATH. - 4.When you're done, restart your PC. Once complete, open Windows PowerShell and enter
dcover versionto check the install andPATHconfiguration - if all is OK, Cover will display the current version.
- 1.Download the Diffblue Cover CLI
.zipfile from: - The Diffblue website - Free Trial version. - The link sent to you via your Diffblue Cover welcome email. - Your organization's internal file/app store. - 2.Unzip the Cover CLI zip file to an appropriate installation location (for example,
~/bin) and add this location in thePATHenvironment variable using the following example commands:\mkdir ~/bincd ~/binunzip ~/diffblue-cover*.zipexport PATH=$PATH:~/binReminder: Make sure that thePATHenvironment variable is set permanently according to your operating system instructions. - 3.Once complete, run
dcover versionto check the install andPATHconfiguration - if all is OK, Cover will display the current version.
Diffblue Cover requires a remote license check with the Diffblue licensing server each time it's used. For help troubleshooting license keys, network connections, and proxy server settings, as well as details of offline licensing (Enterprise Edition only), see Licensing.
- To activate your license, open Windows PowerShell (Windows) or Terminal (macOS/Linux) and enter the command
dcover activate XXXX-XXXX-XXXX-XXXX- replaceXXXX-XXXX-XXXX-XXXXwith the license key provided in your welcome email or provided by your organization. - Entering multiple different license keys will overwrite the existing key.
- You can check your license status by running the command
dcover license
Four steps to automatically write tests - check out a few basics, clone an example project, compile the project and check your environment, and finally, one command to write tests - done.
We won't cover every CLI command option, but here are a few details to get you started:
Command | Description |
|---|---|
dcover help | Help - get, err, help. Use this with the other commands as well to get some details of what options are available (like dcover help create to get details of the available optional arguments). |
dcover activate <lic-key> | Activate License - apply/activate a license. Replace <lic-key> with the license key provided in your welcome email or provided by your organization. |
dcover license | Check License - display your current license status. |
dcover version | Check Version - display the version of Diffblue Cover CLI. |
dcover create | Create Tests - write tests for the project (run from the root directory of the project). You can restrict this further by simply specifying the method or class path - this is detailed a little further in the example in Step 4 below. |
dcover create --<arguments> | Optional Arguments - there's a few, OK quite a lot. The optional arguments provide access to deeper functionality within Cover CLI such as creating coverage reports, specifying a build configuration file, and running preflight checks (this one is used in Step 3 below). |
We're going to make use of an example project (Spring PetClinic) to show Diffblue Cover CLI at work. First, we'll clone the project from the Git repo:
IntelliJ UI
Git CLI
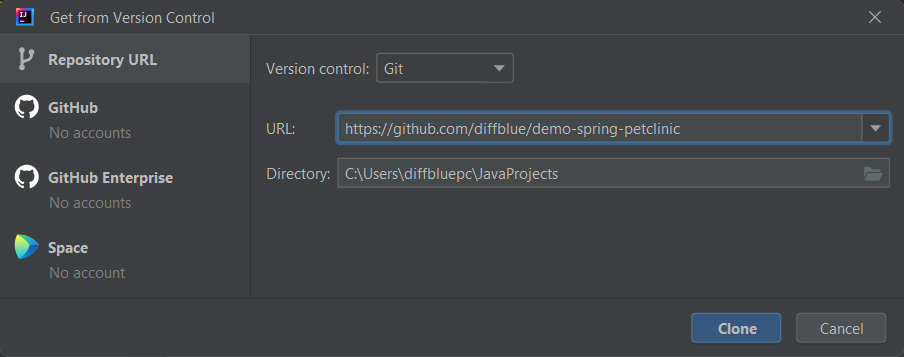
From IntelliJ select
File > New... > Project from version control.- Ensure
Gitis selected inVersion control. - Enter
https://github.com/diffblue/demo-spring-petclinicas the URL. - Select the directory/folder to clone the project to.
- When you're ready, click
Clone.
- 1.Open a command line and navigate to where you want to clone this project.
- 2.Run the following command:
git clone https://github.com/diffblue/demo-spring-petclinic
Before we write any tests, we need to compile the PetClinic project. Diffblue Cover works by analyzing the bytecode of any project used with Cover. Open a command line, navigate to the directory containing the PetClinic project, and run the Maven
package command:cd demo-spring-petclinic
./mvnw package
Basic prerequisites:
- Java 8, 11, 17, or 21 compatible source code.
- Maven 3.2.5+ or Gradle 4.9+ build tools.
- The project (for use with Diffblue Cover) must compile and run with no failing unit tests.JUnit and TestNG testing frameworks are supported.
More details:
Diffblue Cover requires that the system environment (hardware, operating system, network connectivity, Java installation) as well as the project environment (build tooling, dependencies, presence of artifacts, existing unit tests) meet the minimum requirements as detailed in Specs & Reqs. Cover CLI will perform an environment check before analysis begins to ensure that the requirements are met - if there are any issues, these will be reported via the Diffblue Cover panel in IntelliJ using E(Environment) Output Codes.
Check your environment:
Cover CLI also provides a command line option to run these checks, without writing any tests, useful when you just want to check-out your environment without doing anything else. To run a preflight environment check, open a command line, navigate to the directory containing the PetClinic project, and run the preflight checks:
cd demo-spring-petclinic
dcover create --preflight
Initially, we'll create tests for the
OwnerController class:dcover create org.springframework.samples.petclinic.owner.OwnerController
And that's it, simple - 1 command line, 9 methods analyzed, 14 tests written, around 340 lines of code created, and all in around 65 seconds - computationally perfect, human readable. You'll find these tests in:
demo-spring-petclinic/src/test/java/org/springframework/
samples/petclinic/owner/OwnerControllerDiffblueTest.javapackage org.springframework.samples.petclinic.owner;
import ...
@ContextConfiguration(classes = {OwnerController.class})
@ExtendWith(SpringExtension.class)
class OwnerControllerDiffblueTest {
@Autowired
private OwnerController ownerController;
@MockBean
private OwnerRepository ownerRepository;
/**
* Method under test: {@link OwnerController#initCreationForm(Map)}
*/
@Test
void diffbluetestInitCreationForm() throws Exception {
MockHttpServletRequestBuilder requestBuilder = MockMvcRequestBuilders.get("/owners/new");
MockMvcBuilders.standaloneSetup(ownerController)
.build()
.perform(requestBuilder)
.andExpect(MockMvcResultMatchers.status().isOk())
.andExpect(MockMvcResultMatchers.model().size(1))
.andExpect(MockMvcResultMatchers.model().attributeExists("owner"))
.andExpect(MockMvcResultMatchers.view().name("owners/createOrUpdateOwnerForm"))
.andExpect(MockMvcResultMatchers.forwardedUrl("owners/createOrUpdateOwnerForm"));
}
....
Once you're happy with this first set of tests, create the full test suite for the entire PetClinic project:
dcover create
That's it, two "words" and you're done. Of course this one takes a little longer to complete (approx. 5 minutes) as it creates tests across the entire PetClinic project, analyzing 97 methods and creating 77 tests (exact count may vary slightly). To take a look at the tests, open a
xxxDiffblueTest.java file in your IDE of choice (these files are saved to the /src/test/java directory structure by default).Note that the examples here use
DiffblueTest as the default class name suffix and diffbluetest as the default method name prefix, just to highlight the tests created by Diffblue Cover. To change your suffix and prefix, use the --class-name-template and --method-name-template command arguments - see Cover CLI Commands & Arguments for details.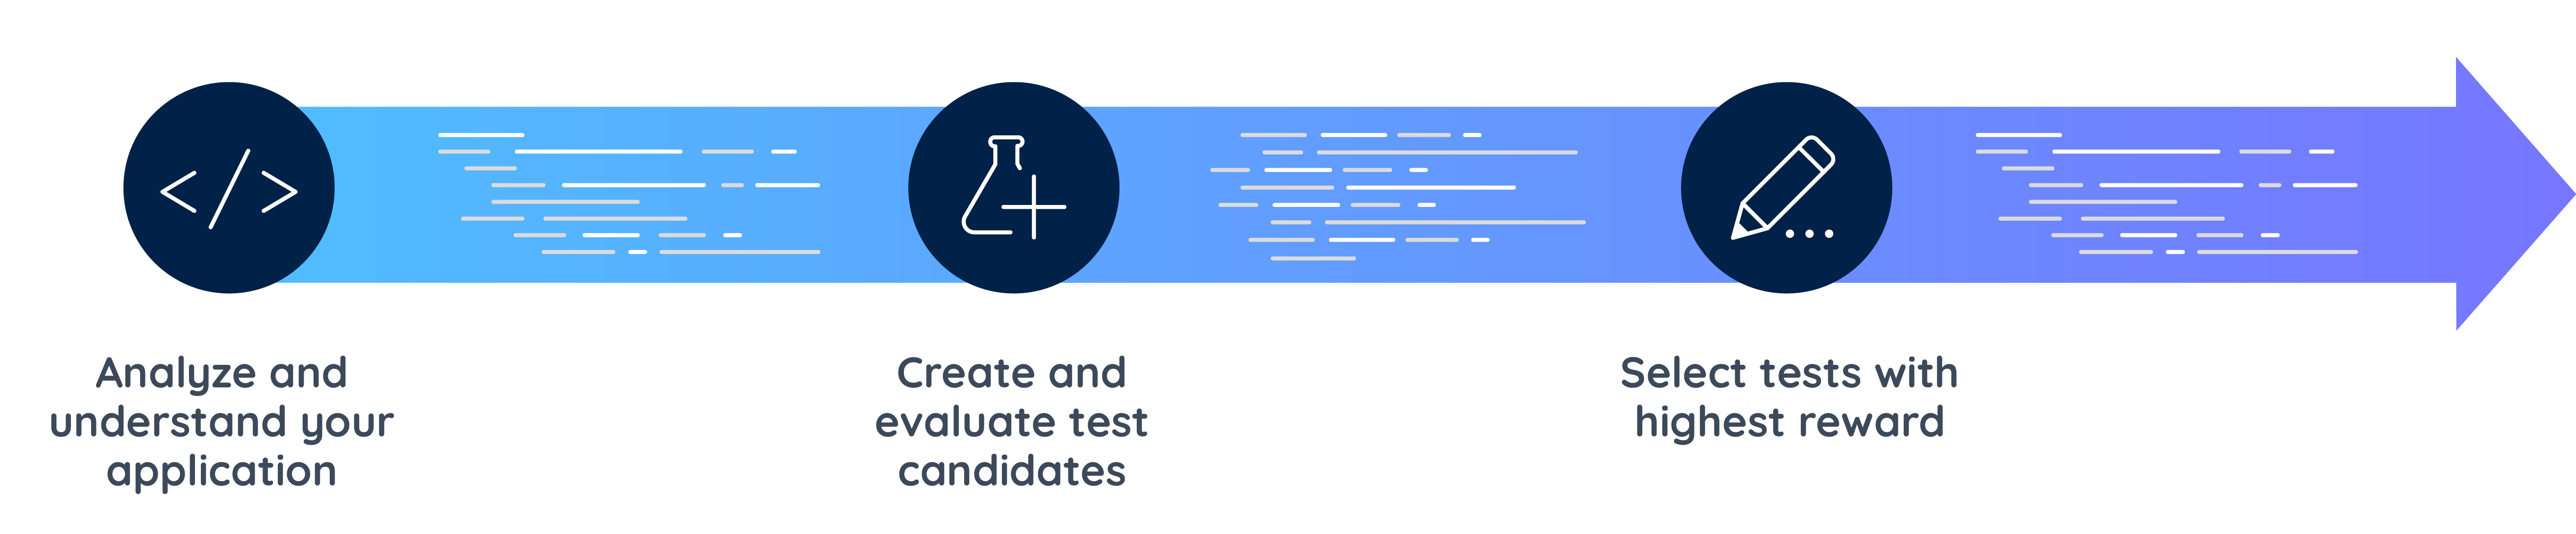
- Diffblue Cover first ensures that your code is compiled and examines each method that Cover will create tests for, including any dependent methods.
- Cover then creates initial test candidates and uses reinforcement learning to evaluate and adjust the test candidate for each method. This process is repeated until the set of tests that optimize coverage are selected and committed to your code base.
Now you're up and running with Cover CLI:
- Have a scan through the Test examples topic which provides some additional source code examples along with an explanation of the tests created by Diffblue Cover.
- Create some tests for your own project - as long as you have a project that compiles and your environment meets the Cover prerequisites, you're literally a single command line away from AI written tests, created in seconds instead of hours.
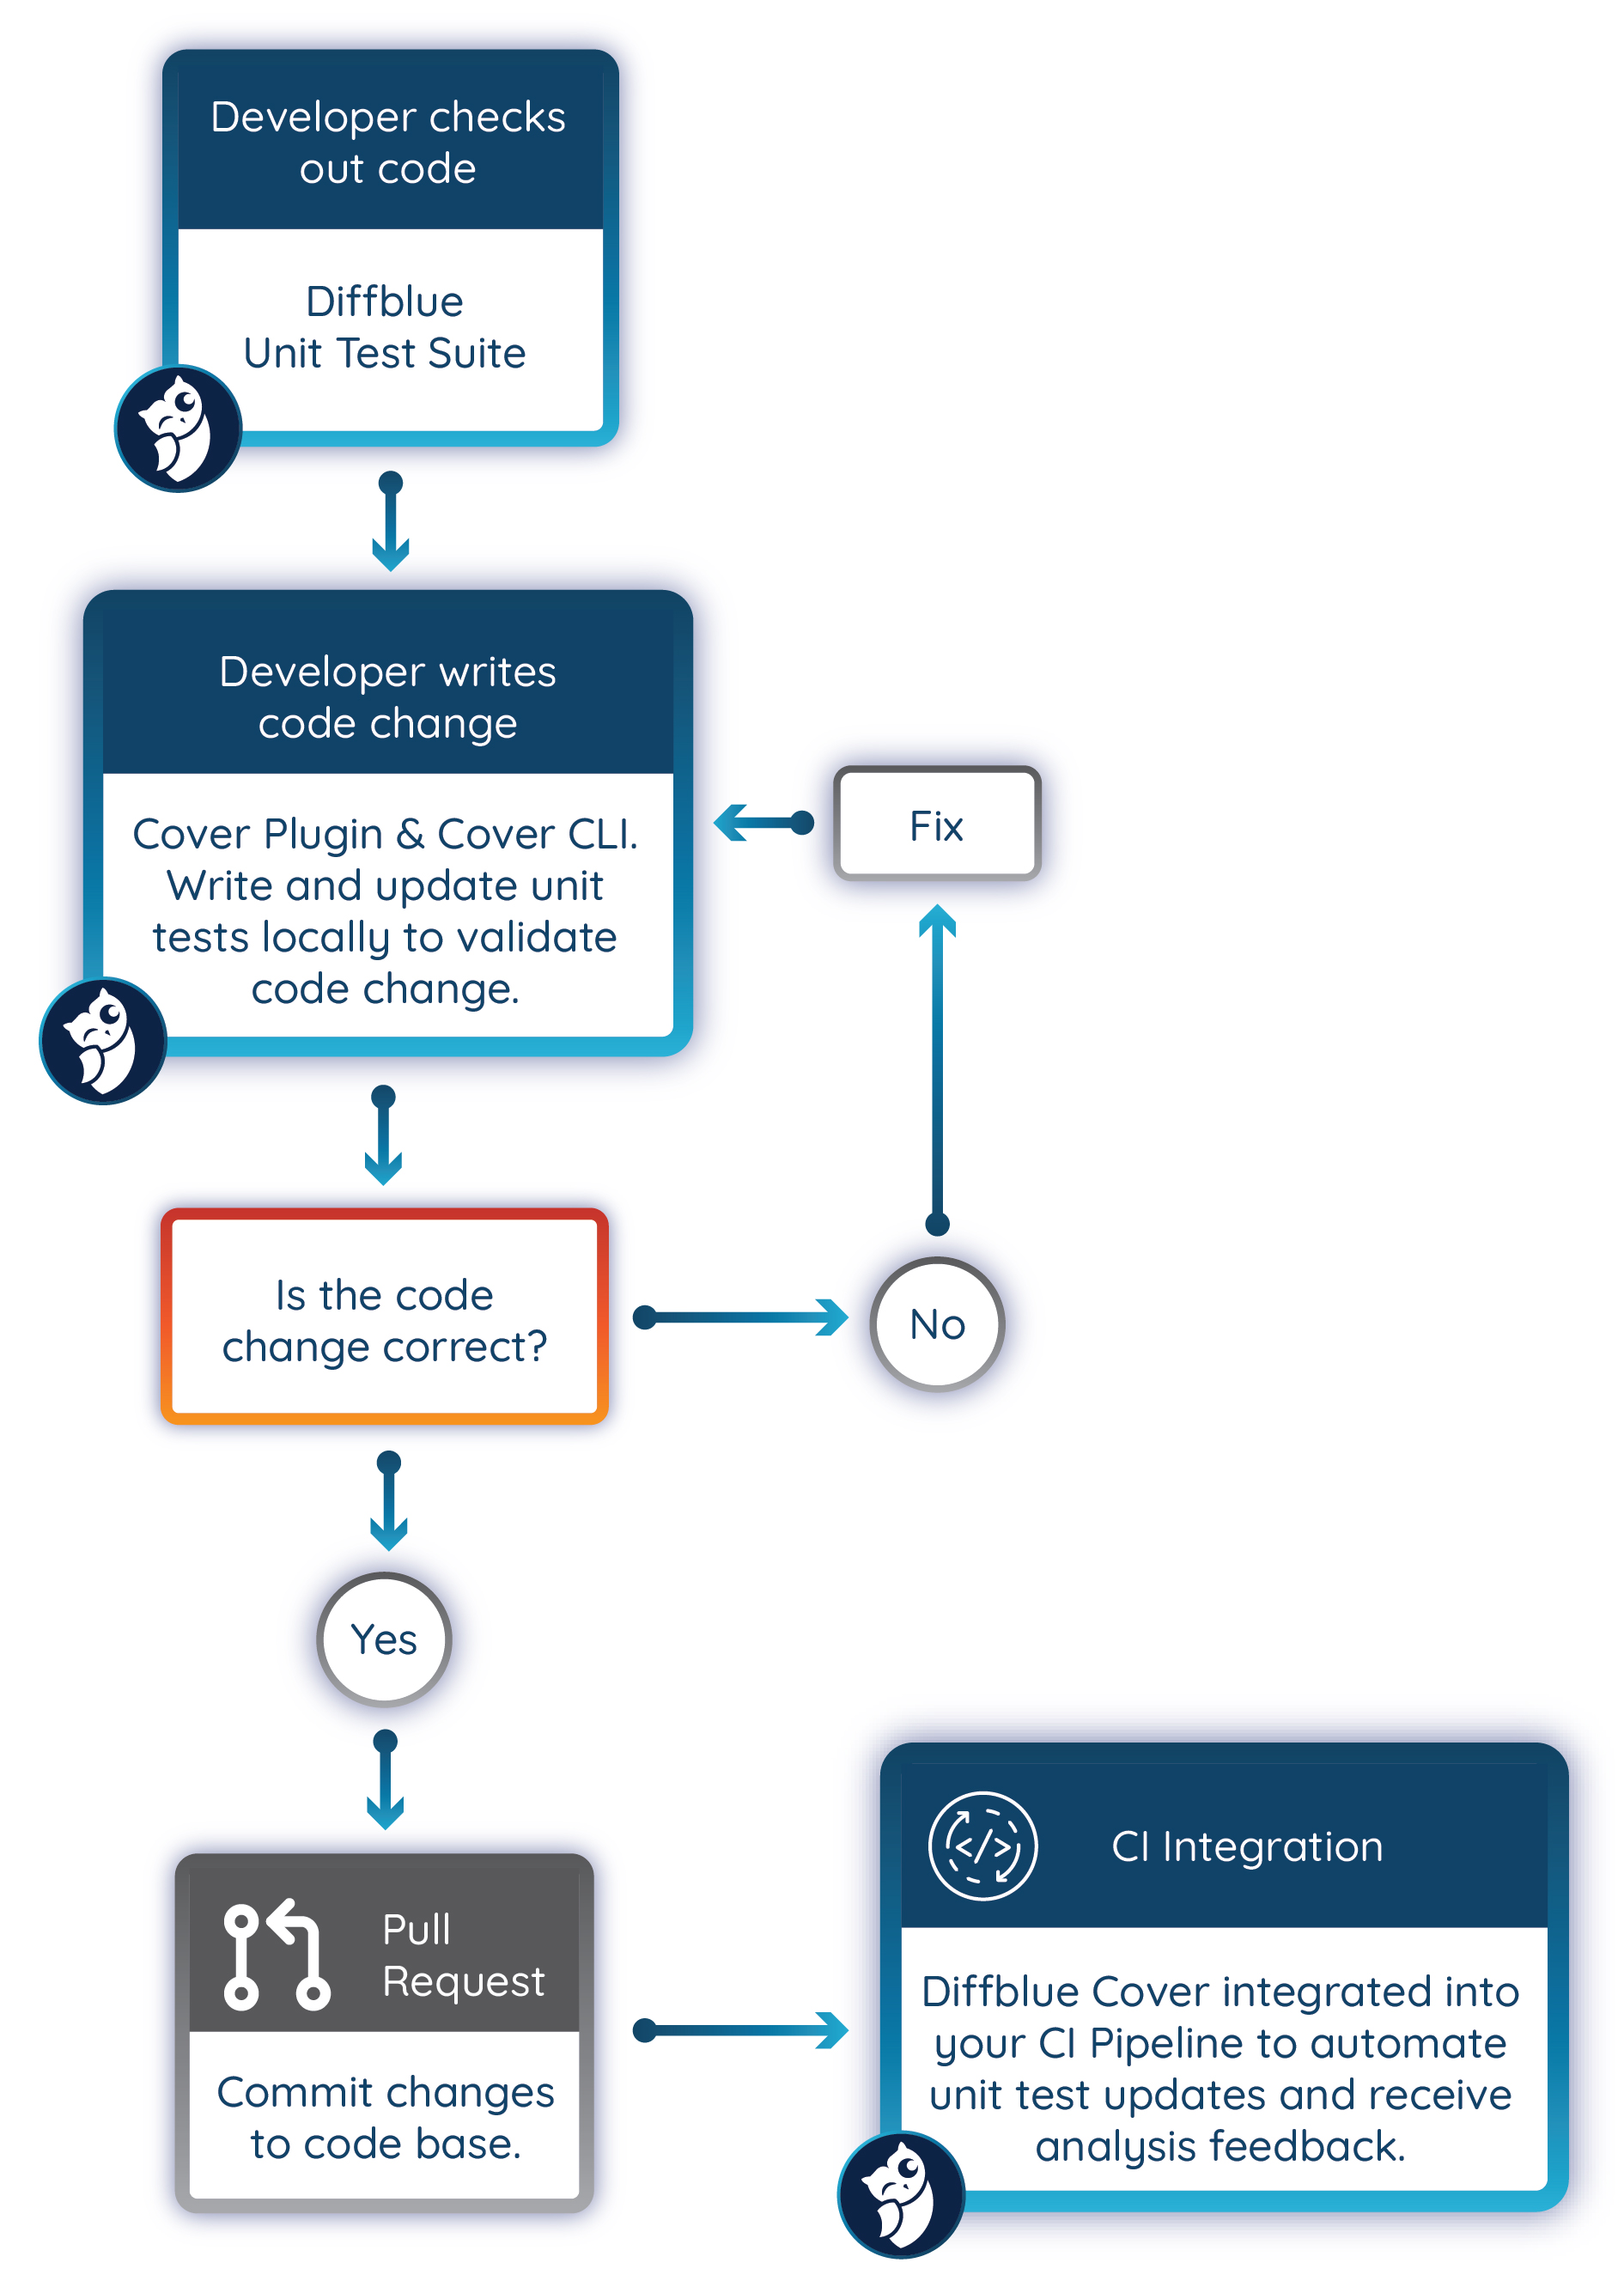
Diffblue Cover is also provided as an IDE plugin tool so you can write tests with one click in the IntelliJ IDE (see Get started - Cover Plugin), and can also be integrated into your CI pipeline to automatically write tests within your CI workflow (see Get started - Cover Pipeline).
But Cover CLI, Cover Plugin, and Cover Pipeline are not mutually exclusive, in fact they make perfect partners. Use Cover Plugin within the IntelliJ IDE to write and check unit tests for your application during development, and also use Cover CLI directly from the IntelliJ Console or your OS command line to access the wider and deeper functionality provided by Cover CLI - finally, use Cover Pipeline within your CI tool to automate the whole process and provide consistency across your organization.
Last modified 5d ago